Oh no! Has your treadmill belt packed up? Your best friend that helped you keep your fitness through the lockdown caught an injury. A folded or creased belt ruins your treadmill experience, and it also damages the internal working parts of the machine.
Fortunately, fixing a folded, wrinkled or creased belt isn’t as challenging as you think. It’s like your treadmill pulled a hammy – it just needs some TLC. There’s no need to abandon your treadmill or throw it away over belt problems. Read Here: 10 Best Nordictrack Treadmills
The reality is treadmills get belt problems, regardless of the manufacturing brand. Learning how to handle these maintenance issues by yourself can save you hundreds of dollars in servicing fees. This post looks at how to fix a treadmill belt that is folded in seven easy steps.
Read More:
- Best 3 Peloton Elliptical Reviews
- Best 3 Incline Treadmill Reviews
- Sole F85 Treadmill Reviews
- Top 3 Matrix Treadmill Reviews
- Best Elliptical Machines Under $500: Top 5 Options Reviewed
What Causes Treadmill Belts to Fold?

Treadmills are simple machines with basic operating principles. The belt runs over the platform at high speed, with rollers designed to keep the belts tracking in place as you run.
However, as you increase speed and pace, the impact between the belt and your feet on the platform creates friction. The faster your run, the more friction created. When the materials in the belt experience an increase in heat due to the added friction, it makes the belt pliable and easier to distort.
As a result, the belt may start to shift slightly under your feet. The shifting may result in rippling, creases, or folds in the treadmill belt. If you use your treadmill daily, the wear-and-tear on the machine loosens the tension between the belt and the rollers.
When combined with friction, it’s possible for you to fold or crease the belt during operation. Your treadmill needs regular maintenance to remain in tip-top condition.
If you have never serviced the machine, and it’s over a year old, then the chances are the rollers and belt are loose, and that’s the cause of the problem.
Can I Fix a Folded Treadmill Belt?
Treadmill belts have a single-use design. If they experience a fold, creases, or ripples, you’re going to need to throw away the belt and fit a new belt to the machine. Tightening the rollers and the tension on the belt may help in minor creasing and rippling of the material.
However, running a damaged belt in the machine make causes faults to occur in other working parts. It’s always the better option to replace the belt. Contact the manufacture or dealer for a quote on a replacement part.
What are the Tools Required for Repairing the Treadmill?
Our first stop on how to fix a treadmill belt that is folded involves identifying the right tools for the job. You’re going to be taking apart certain machine components, and you need the right tools for the job.
- A flathead, star, or Philips screwdriver, depending on the manufacturer.
- An Allen wrench (typically included with the purchase on your machine).
- Safety gloves.
- A replacement treadmill belt.
- Plenty of patience.
Look for the owner’s manual that came with your machine. The booklet should contain instructions on how to change the belt. If you don’t have the manual, you’ll have to search for your specific model number online or call the manufacturer and ask them to email you the instructions.
Read More:
- Best 3 Peloton Elliptical Reviews
- Best 3 Incline Treadmill Reviews
- Sole F85 Treadmill Reviews
- Top 3 Matrix Treadmill Reviews
- Best Elliptical Machines Under $500: Top 5 Options Reviewed
How to Fix a Treadmill Belt That is folded: In 7 Easy Steps
If the treadmill belt has folds or creases in it, it means the tracking for the machine is off. If there are minor folds, wrinkles, or creases, you might get away with a simple adjustment to correct the problem.
STEP 1 – IDENTIFY THE PROBLEM SIDE
Safety first, unplug the treadmill power cord. Next, identify the problem side of the belt. It typically slips more toward the side of the platform with the looser roller.
Step 2 – Remove the Motor Cover
Unscrew the bolts on the motor cover located at the front of the machine. Remove the motor cover and pullup the treadmill platform, using the latch the keep it in place.
Step 3 – Find the Rear Roller Bolts
Locate the rear bolts on either side of the end of the treadmill. If you can’t find them, you’ll need to remove the side foot rails of the machine to access them. The footrails typically have Philips-head screws that are easy to remove with a screwdriver.
Step 4 – Adjust the Rollers
Use the Allen wrench supplied with your treadmill to loosen the roller bolts. If you lost or misplaced the Allen key, you can pick one up from the local hardware store. Ask the attendant at the store for a recommendation on the right size for the job.
The bolts on the rollers will tighten the belt when turning them clockwise. Anti-clockwise turns to loosen the belt. It’s important not to overtighten the bolts. Overtightening may cause strain against the electric motor, causing it to burn out. If the roller bolts require more than a full turn, tighten the other side of the machine as the entire belt may be loose.
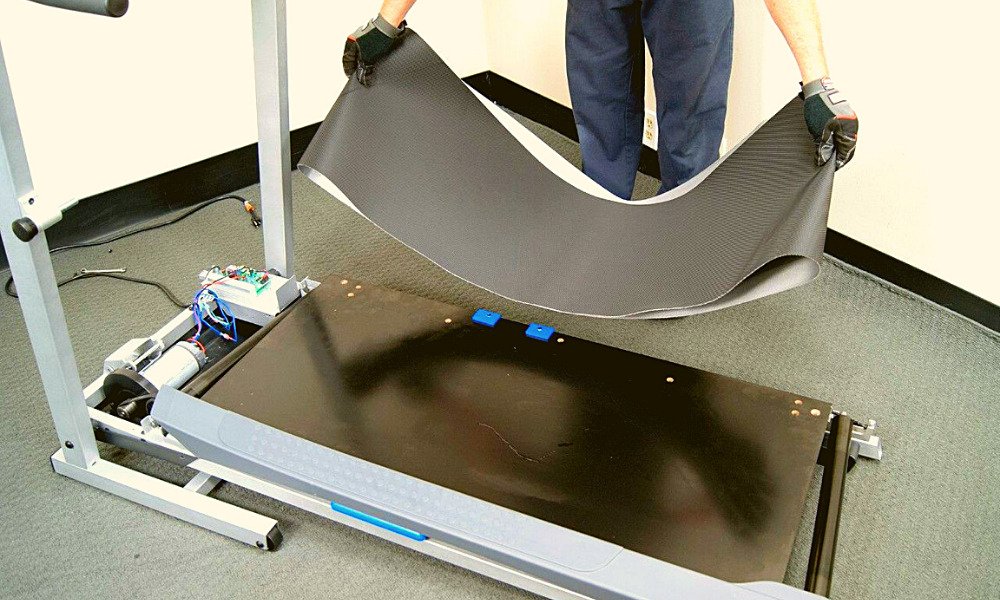
Step 5 – Remove the Roller
If the damage to the treadmill belt is extensive, you’re going to need to replace it. Damaged belts can ruin the rollers and place unnecessary strain on the motor, reducing the machine’s service life. How to fix a treadmill belt that is folded might seem like a complicated task, but it’s easy if you follow these instructions.
Loosen the treadmill rollers on either side of the machine to the fully loose position. You’ll find that it’s easy to lift the roller out of the housing when it’s in the fully loose position. Pull the belt over the roller and off the platform. Replace the worn belt with the new one, and place the roller back into the housing.
Tighten the rollers equally until the belt is tight, but don’t overtighten.
Step 6 – Check the Tracking
Before reassembling the treadmill, you’ll need to check that the belt is tracking straight during operation. Start the machine at a low speed and look at the belt as it moves over the platform.
Tighten either side of the machine using the roller bolts to compensate for the shift in the tracking. It may take a few attempts to get the belt running straight. Make sure you never use the treadmill if the belt isn’t perfectly straight, as you’ll wrinkle or fold your new replacement.
For the best tension on the belt, you’ll need to ensure that it has three to four inches of free-play away from the platform. Any tighter than this will reduce motor performance.
Step 7 – Reassemble the Treadmill
After you’re satisfied that the belt is tracking correctly, it’s time the reassemble the machine. Reverse the steps you took to disassemble the treadmill and replace the footrails if necessary. Most models follow this procedure.
Pullup the platform and release the latch. Place the platform down into the flat position and attach the frame screwing in the corner bolts. Fasten your footrails and then attach the motor cover. Make sure all screws are hand-tight and don’t over-tighten, or you’ll strip the threads.
Read More:
- Best 3 Peloton Elliptical Reviews
- Best 3 Incline Treadmill Reviews
- Sole F85 Treadmill Reviews
- Top 3 Matrix Treadmill Reviews
- Best Elliptical Machines Under $500: Top 5 Options Reviewed
How Do I Maintain My Treadmill Belt?
It’s important for treadmill users to create a maintenance schedule for the machine. Maintaining your treadmill doesn’t have to take much time if you do it when needed. Regular maintenance allows for longer service life from the motor and the running belt, giving you optimal performance during use.
A well-maintained treadmill belt can last up to 2-years or more, even with frequent use. Maintaining the belt also improves motor service life. With correct maintenance, your motor could last for more than 10-years. Read Here: The Best Treadmill For Heavy Person Reviews
To maintain your treadmill properly, you’ll need to clean the belt and platform every two weeks and lubricate the belt rollers every 3-months. If you’re a heavy user of your treadmill, then you might have to adjust your schedule to accommodate smaller windows of time between maintenance sessions.
How Can I Tell If My Treadmill Belt is Worn Out?
By now, you should have a solid understanding of how to fix a treadmill belt that is folded. However, it’s also important to know when your treadmill belt is worn out and in need of replacement. Running on threadbare belts can also cause injuries and malfunctions to the machine.
Look for any fraying or curling on the edges of your treadmill belt. Check the seams for signs of fraying or tearing. These two areas represent the most common parts of the belt where you’ll notice the first signs of wear.
If your treadmill is under warranty, the manufacturer may offer you a free replacement within a warranty period. However, if your machine is outside of the warranty period, you’ll need to purchase a replacement. Replacements are available directly from the manufacturer or from the dealer that sold you the treadmill. Read Here: Top Five Best Treadmills For Seniors – Reviews & Buyers Guide
The average cost of a replacement belt for the machine varies between $150 to $350, depending on the manufacturing brand. However, it’s much more affordable than buying a new treadmill and easy to replace if you follow the steps in this guide.
Read More: